Making a web-site
Mapping a drive /
Creating a web /
Entering text / Adding images /
Making Links
Making a web 02 |
|
We will map to a particular folder on a particular server in a
particular domain of the Austin College Network. To take advantage
fully of FrontPage in web design and management, you will need to map a
drive, so that the server you are using, in this case "Erasmus," is a
virtual drive of the computer you are using. The advantages of this
procedure will become evident as we work with webs.
1. Double-click on "My Computer" (or
open Windows Explorer: "windowKey-E"). On the "Tools" menu choose "Map
Network Drive."
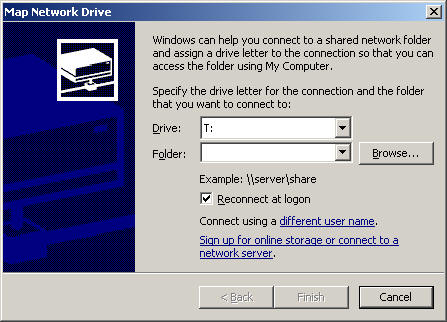
2. Choose a drive letter or let the
program choose it for you, but you will need to know the drive letter. In
the image above the letter suggested by the program is "T." (Any
letter will do.)
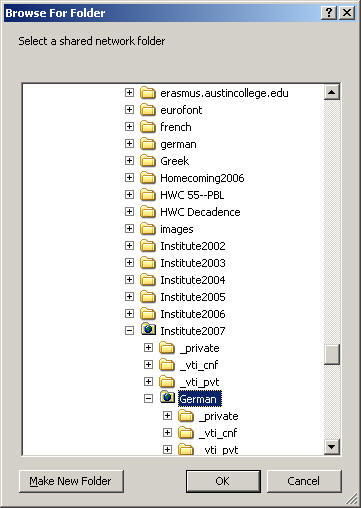
3. Choose "Browse." Your next display
will present you a representation of the local (A.C.) network. You need to
search further on the "Admin" domain.

4. Open the "Admin" domain and scroll to the computer named
"Erasmus" -- our server; then scroll to CMLWeb.
6. In CMLWeb
choose the folder "Institute2007/German" Now click "OK" and the drive will be
mapped. You
may have to map a drive any time you want to save work to the Institute
folder.
7. When you have mapped a drive, you have
created access to another computer (in this case, a server) on the network and will from that point
on be able to treat that computer as though it were a drive of the machine
with which you are working. this is essential for all work with FrontPage
webs. |
Our web work will involve the program Microsoft FrontPage 2003. There
are to be sure other programs that accomplish these tasks equally well.
The College network is uniform in this regard is uniform. FrontPage is
installed on all College computers running Windows. A note of caution:
the displays that FrontPage uses are somewhat similar to those of "Windows
Explorer," or the program initiated by clicking "My
Computer." Make sure you know which display you are looking at: the
FrontPage display has a gray pane on the left.
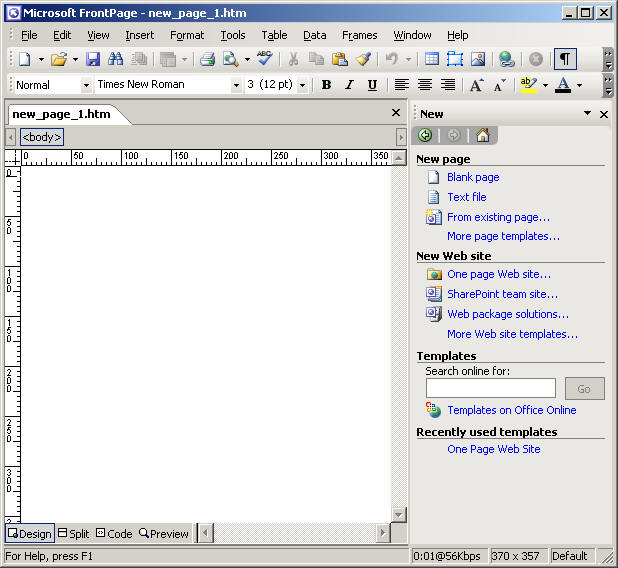
1. Open FrontPage.
2. Choose: "File-New" You will see a window like the one below.
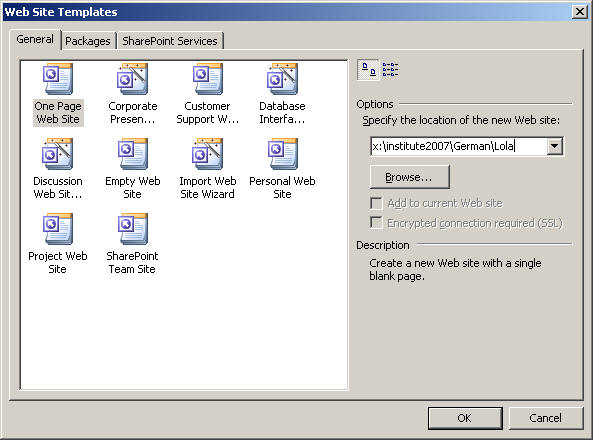
3. In the box on the right Specify
"One page Web site..." In the next window choose "Empty Web Site" and
then on the right side you must specify the location of your folders. Use the
browse button to choose your folder. (Here I have mapped to Lola's folder.)
4. Click "OK." You will
next see a window like this.

8. In the "Folders" pane, double-click the icon
for the file: "index.htm." That file will now appear in the large page pane. Click on the page and type something on it,
your name, a favorite saying, whatever.
9. Save the page. (File-save, or the save icon)
10. Close FrontPage.
11. Open a web browser, say Microsoft Internet Explorer
(IE). Type in the course URL: "http\\cml.austincollege.edu\Institute2007\German\Lola".
See if your page comes up.
13. Close your browser.
14. Log off the computer.
Once is not enough
1. Go to another computer. Log in as you.
2. Make sure a drive has been mapped our web folder on "erasmus/CMLWeb". Start FrontPage.
3. Open your web. ("File-Open Web"). Open your index page ("index.htm")
Text is entered in FrontPage much in the same way that familiar
word-processing programs operate. You can control the look of the text you enter
by using the "Style," "Font," and "Font-Size"
windows below the menu bar. Further control is available through the
"Format" menu by choosing "Format-Font" and
"Format-Paragraph." Remember that any fonts you choose will be
downloaded from the hard drive of your user's computer. If that computer
does not have the really cool font you have chosen, then her
computer will resort to the "default" font, usually "Times"
or "Times New Roman."
You can also add text from other programs by using the "Edit-Copy"
then "Edit-Paste" commands.
When the user opens your page in his browser, the text you have entered will
wrap at the edge of his window. Since there is no telling what this width might
actually be, there is no way of predicting where your lines of text will break.
You can enter your own line breaks by "Shift-Enter." (You hold down
the Shift key while you strike the Enter key.)
Acquiring images. The most productive way to work with images is
to add the .JPG and .GIF files to your web. The "Images" folder is
ideal for this, although it is in no way required. (You can place image
files wherever you like within your
web.)
Adding images to the page. Once you have placed images in your web,
you can insert them in a page by means of the command: "Insert-Picture-from
File." You may also use the "Edit-Copy" command to pick up
an image from another program, then use the "Edit-Paste" command to
place an image in a file in FrontPage. If you do this, FrontPage will ask you
where to store the file the next time you invoke the "File-Save"
routine. It is a good idea to keep track of where your image files are located.
Perhaps the easiest way to keep track is to use a folder in your Web entitled
"Images."
Controlling image size. FrontPage provides a utility for resizing the
image. You may either use the "Format-Properties" command, choosing
the "Appearance" tab, or you can use the sizing handles that appear
when you click on the picture in "Normal View." JPEG files lose less
clarity when you resize that do GIF files, and all images lose resolution when
you make them larger, which, accordingly, is usually a bad idea.
The power of the Web depends on the ability to make links. You click with the
mouse on something and something happens. The basic linking process
associates a segment of text with another file somewhere on the
World-Wide-Web.
Before you create a link to another page you must
logically have another page in mind. For the purposes of this exercise, let's
make a new page.
Create a new page in your Web, either by using either the menu command
"File-New" in FrontPage or by clicking on the blank page icon, usually located
directly under the "File" menu. Put something on the page either text
or graphics or both, then save the page to your Web. (Use "File-Save"
or click the icon that looks like a floppy disk.) In order to save the file you
will have to give the page a name. Once you have saved the page to your
web, it should show up in your folder pane to the left of the pane in which you
are working.
Now go back to the original page. Choose the menu command "Window",
locate your original file and select it. Select a segment of text in your
original file (presumably "Index.htm"). Now choose the menu command: "Insert-Hyperlink". In the
window that appears--it looks like this--
Choose the file to which you want the selected text segment to be linked,
then click "OK".
In the same way that text-segments may be linked to another file on the Web,
so may an image. Once the image is on your page, select the image and use the
hyperlink button (or the menu command: "Insert-hyperlink"). In
the URL box write in the Internet address (URL).
Hint: This action can be facilitated by using the Control-C function for
copying the URL from the target web page, pasting into the URL line on the
FrontPage Hyperlink window.